
7x14 Microgreen Tray Kit: Complete Growing Guide for Beginners
Want to start growing fresh microgreens at home without the mess of soil? The 7x14 On The Grow Microgreen Tray Kit has become our most popular grow tray system for home growers, and for good reason. This compact, all-in-one kit makes growing nutrient-dense microgreens simple and reliable, whether you're brand new to growing or looking for a better system.
In this comprehensive guide, we'll walk you through everything you need to know about using the 7x14 tray kit, from unboxing to harvest. By the end, you'll understand why thousands of home growers have made this their go-to microgreens setup. If you're brand new to growing, you may also want to start with our Beginner's Guide to Growing Microgreens or grab our Beginner's Guide PDF.
Watch our complete video tutorial below, then follow along with the detailed written instructions:
Quick Answer: What Is the 7x14 OTG Microgreen Tray Kit?
The 7x14 OTG Microgreen Tray Kit is a complete, beginner-friendly microgreens growing system that includes a mesh tray, reservoir tray, dual-purpose humidity dome, two reusable silicone grow mediums, and a cleaning scraper. It's sized for home growers (one tray feeds a family of 2 to 3 for 3 to 4 days), supports both soil-free and traditional soil/coco coir growing, and uses a bottom-watering reservoir that lets you check water every 2 to 3 days instead of daily. Seeds, lights, and nutrients are not included so you can customize your setup.
What Is the 7x14 Tray Kit?
The 7x14 On The Grow Microgreen Tray Kit is a complete microgreens growing system designed specifically for home growers who want fresh, organic greens without dedicating their entire kitchen to the project.
What's Included in the Kit:
- (1) White Mesh Tray: Perforated bottom allows roots to grow through for bottom-watering
- (1) White Reservoir (Base) Tray: Holds water for easy bottom-watering system
- (1) Clear Humidity Dome: Dual-purpose: flips upside down as weighted cover during germination, then right-side up for humidity control
- (2) Reusable Silicone Grow Mediums: Pre-cut 7x14 silicone with 1.2mm holes for soil-free growing
- (1) Microgreen Medium Scraper: Makes cleanup quick and easy
What's NOT Included:
- Seeds (so you can choose your favorite varieties)
- Grow lights (optional, windowsill growing works too)
- Nutrients/fertilizer
- Soil or coco coir (if you prefer traditional growing)
Why This Kit Works: 5 Key Benefits
1. Beginner-Friendly Design
"The setup is very easy, and watching OTG videos helped take the guesswork out of how much seed and water to use." — Customer Review
The 7x14 kit eliminates the confusion that stops most people from starting. Everything works together seamlessly. The mesh tray nests perfectly in the reservoir, the dome fits precisely for both weighted germination and humidity control, and the silicone is pre-cut to size. No modifications, no guesswork, no frustration.
2. Perfect Size for Home Growing
One of the biggest complaints we hear about microgreens is that standard 10x20 trays produce too much at once for small families. The 7x14 kit solves this perfectly.
Production capacity: One tray feeds a family of 2 to 3 for about 3 to 4 days.
Real customer experience: "One tray of microgreens lasts my family of 3 about 4 days so having 2 for a particular plant makes sure our family never runs out of something we enjoy such as broccoli."
The compact footprint (14.4" L x 7.25" W x 4.2" H with dome) fits on countertops, windowsills, under cabinets, or on small shelving units where larger trays simply won't work.
3. Low-Maintenance Watering
This is the feature customers rave about most.
"The real reason I stick with these trays is the ease of water maintenance. My work schedule fluctuates drastically from day to day so being able to simply check the water every 2-3 days is great." — Customer Review
Unlike top-watering methods that require daily attention, the reservoir system holds enough water for 2 to 3 days. The clear sides let you see water levels at a glance. For busy schedules, forgetful growers, or anyone who wants fresh greens without babysitting them, this is a game-changer.
4. Grow Soil-Free or Traditional
The kit includes two reusable silicone grow mediums, which means you can grow completely soil-free if you want. No mess, no disposal, just rinse and reuse. But if you prefer the traditional route, the trays work perfectly with soil or coco coir too.
Soil-free benefits:
- No mess on countertops
- 5-minute cleanup time
- Reusable for 20 to 30+ grow cycles with proper care
- Perfect for apartments or small spaces
- Easier root harvesting
Traditional medium option:
- Use seed-starting soil or coco coir
- Holds about 6 cups of medium
- More familiar for experienced gardeners
- Works great for certain varieties
5. Built to Last
"This tray also feels good in the hands. The plastic construction is thick. I'm not afraid of it breaking if I drop it or am a bit rough with it in the sink. You can tell it was built to last for years of use." — Customer Review
Made from food-safe PP (Polypropylene) plastic, these trays are dishwasher safe (top rack, no heat), thick enough to handle daily use, and backed by a 1-year warranty. Customers consistently mention how solid and well-built the kit feels compared to cheaper alternatives.
How to Grow Microgreens with the 7x14 Kit
We'll cover two methods: growing with the included reusable silicone grow medium (soil-free), and growing with soil or coco coir.
Method 1: Growing with the Reusable Silicone Grow Medium (Soil-Free)
This is the method most home growers prefer because it's clean, simple, and the silicone lasts for 20 to 30+ grow cycles with proper care.
Step 1: Set Up Your Tray
- Place the white mesh tray on top of the white reservoir (base) tray
- Optional: Add 1 to 3 cups of water to the reservoir for extra humidity during germination
- Set the clear humidity dome aside for now
Step 2: Add the Reusable Silicone Grow Medium
- Take one piece of silicone and place it evenly on top of the mesh tray
- Note: The silicone will cover the mesh holes but won't fit perfectly corner to corner. This is normal and doesn't affect growing.
- Lightly mist the silicone with water to prep for seeding (this helps seeds stick)
- Avoid pooling water. Just a light mist.
Step 3: Seed Your Tray
Recommended varieties for beginners:
- Broccoli (see our How to Grow Broccoli Microgreens guide)
- Radish
- Kale
- Collard
- Peas (see our Pea microgreens guide)
- Mustard
Seeding rates:
- Small seeds (broccoli, radish, kale): 1 to 2 tablespoons (15 to 30 grams)
- Large seeds (peas, sunflower, beans): 3 to 6 tablespoons (45 to 90 grams)
How to seed evenly:
- Lightly mist the silicone to prevent seeds from bouncing
- Sprinkle seeds evenly across the entire surface
- Avoid clumps and bare spots
- Don't worry about perfection. Close enough works great.
For detailed seeding charts by variety, download our free seeding guide. You can grab your favorite varieties through our affiliate partner True Leaf Market.
Step 4: Water Your Seeds
- Use a spray bottle to generously water the seeds
- Spray for about 13 seconds with a hand pump sprayer
- Seeds should be wet but not swimming
- If you see large pools forming, wick up excess with a cloth or paper towel
- Small droplets on the silicone are fine
Critical watering tip: Overwatering is the #1 cause of mold and germination failure. You want everything wet, but not waterlogged. For more on this, read our complete guide to mold prevention.
Step 5: Cover and Apply Weight
- Flip the clear humidity dome upside down
- Place it directly on top of the seeds
- The dome's weight will make contact with the seeds (this is exactly what you want)
- Optional: Add extra weight if needed (a book or another tray)
Why this works: The upside-down dome serves two purposes. It weighs down the seeds to improve germination and traps humidity. This is one of the cleverest features of the kit. For a deeper look at this phase, see our weight-to-blackout transition guide.
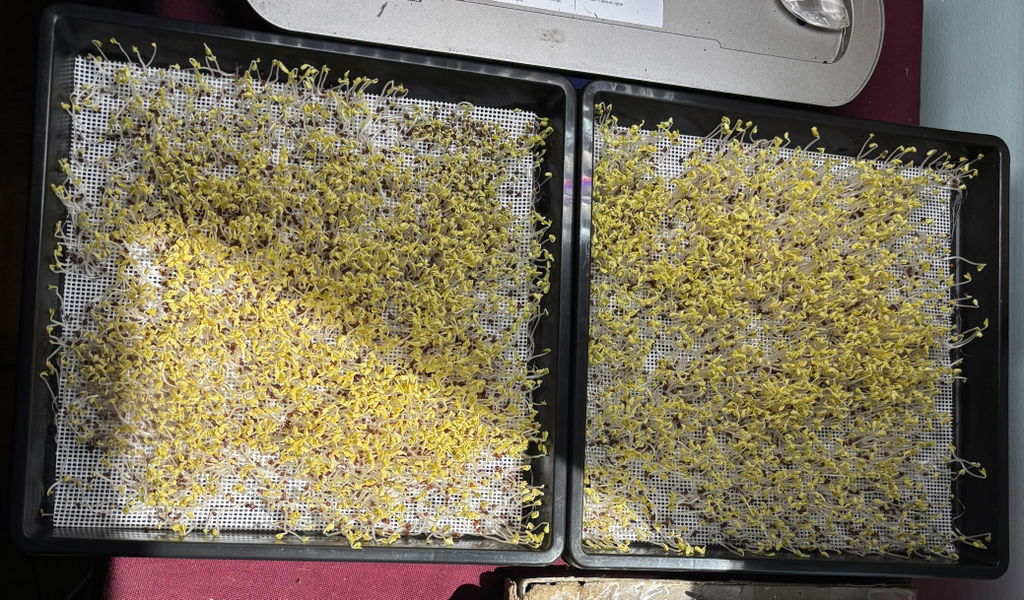
Step 6: Germination Phase (2 to 4 Days)
- Place the tray in a dark location (closet, cabinet, or dark shelf)
- Mist seeds twice daily, morning and evening
- Check progress daily
- What you're looking for: Seeds pushing the dome up, more yellow plants showing than dark seed hulls
Germination timeline by variety:
- Broccoli, radish, mustard: 2 to 3 days
- Kale, collard: 3 to 4 days
- Peas: 3 to 5 days
- Sunflower: 4 to 6 days
Step 7: Transition to Humidity Dome
When your crop is about 75% germinated (more yellow/green than dark seeds):
- Lightly mist the plants
- Check that roots are developing
- Flip the dome right-side up to create a proper humidity dome
- Place it on top of the mesh tray
- Return to the dark shelf for 1 to 3 more days
Purpose: The humidity dome creates warmth and moisture that encourages rapid upward growth, making your microgreens taller and easier to harvest.
Important: Don't leave them in the humidity dome too long (max 1 to 3 days) or you'll get lanky, weak stems that topple over. You want just enough stretch for easier harvesting.
Step 8: Expose to Light and Begin Bottom-Watering
- Remove the humidity dome completely
- Place the tray under grow lights or on a bright windowsill
- Add up to 3 cups of pH-balanced nutrient water (5.5 to 6.5 pH) to the reservoir tray
- The water should just reach the inner shelf supports, not flooding the mesh
Watering schedule:
- Check water levels daily
- If crops drink quickly, replenish daily
- For slower drinkers, refresh every 2 to 3 days
- Water should always be touching the bottom of the roots
How to check water level: Slightly lift the mesh tray and look for water droplets on the bottom or roots. If you don't see any, add more water. You'll feel slight resistance (like a weak magnet) when water is touching the tray.
Fertilizer guidance:
- With silicone: Use hydroponic nutrients mixed per label directions
- Our recommendation: OceanSolution 2-0-3 at 0.5 oz per gallon
- Always pH-balance water to 5.5 to 6.0 range after adding nutrients
Why fertilizer matters with silicone: the medium is completely inert, so the only nutrition your plants get during the grow is what's in the water. For a deeper breakdown, see our free fertilizer ratio guide.
Step 9: Harvest (7 to 14 Days)
Your microgreens are ready when:
- First true leaves are forming (the second set of leaves)
- Plants are 2 to 3 inches tall
- Vibrant green color
- Strong stems
How to harvest:
- Use clean scissors or a sharp knife
- Cut just above the silicone surface
- Rinse harvested greens and enjoy!
Yield expectations: One 7x14 tray produces approximately 2 to 4 ounces of fresh microgreens depending on variety. For more harvest tips, check out our harvest methods comparison.
Method 2: Growing with Soil or Coco Coir
Prefer traditional growing? The 7x14 kit works great with soil or coco coir too. If you need coco coir, we recommend this coco coir from our Amazon storefront.
Step 1: Set Up and Fill Your Tray
- Place the mesh tray on top of the reservoir tray
- Fill the mesh tray with 6 cups of seed-starting soil or pre-moistened coco coir
- Break apart any clumps
- Spread medium evenly
- Gently press flat without compacting
Step 2: Seed Your Tray
Follow the same seeding rates and process as the silicone method (see Step 3 above).
- Lightly mist the soil/coco to prevent seeds from bouncing
- Evenly distribute seeds across the surface
- Avoid clumps and bare spots
Step 3: Water Your Seeds
- Spray seeds with regular or filtered water for about 13 seconds
- Seeds should be wet, medium should be moist but not saturated
- No pooling or over-saturation
Step 4: Cover and Weight
Same as silicone method. Flip the dome upside down and place on seeds.
Step 5: Germination (2 to 4 Days)
- Place in dark location
- Mist twice daily (morning and evening)
- Monitor germination progress
Step 6: Humidity Dome Transition
When 75% germinated, flip dome right-side up and return to darkness for 1 to 3 days.
Step 7: Light and Bottom-Watering
- Remove dome
- Place under lights or on windowsill
- Add up to 3 cups of water to reservoir tray
- For coco coir: Use pH-balanced water (5.5 to 6.0) with nutrients
- For soil: Use plain water only. Soil has nutrients already.
Important difference: Don't add hydroponic nutrients if using soil. This can cause tip burn and stunted growth. Soil provides all the nutrition microgreens need.
Step 8: Harvest (7 to 14 Days)
Same timeline and process as silicone method. Cut, rinse, enjoy!
Cleaning and Maintenance
One of the biggest advantages of the 7x14 kit is how easy it is to clean and maintain. For a complete deep-dive, read our full cleaning and sanitization guide.
Cleaning the Trays and Humidity Dome
Method 1 (Recommended):
- Hand-wash with hot water and food-safe dish soap
- Rinse thoroughly
- Air dry or towel dry
- Store out of direct sunlight
Method 2 (Dishwasher):
- Top rack only
- No heat/no heated dry cycle
- Heat can warp the trays
Cleanup time: About 2 to 3 minutes per tray.
Cleaning the Reusable Silicone Grow Medium
"The scraper is great and just the right size for everything. It's a simple piece of plastic but oh boy does it clean up the mesh tray and silicone well." — Customer Review
Step-by-step cleaning:
- Remove roots: Use the included Microgreen Medium Scraper to gently remove root mass from the silicone
- Wash: Use warm water and free-and-clear soap (Dr. Bronner's or Seventh Generation work great)
- Gentle scrubbing: Use your hands to lather and rinse. Avoid brushes or abrasive scrubbers that can damage the silicone.
- Rinse thoroughly: Make sure all soap residue is gone
Sanitization (choose one method):
- Option 1: Boil in water for 1 to 2 minutes
- Option 2: Soak in hot water + dish soap for 20 minutes
- Option 3: Spray or soak with food-grade 3% hydrogen peroxide for 10 to 20 minutes
Drying: Air dry completely before storage.
Total cleanup time: Approximately 5 minutes per grow.
Silicone Lifespan and Care
Expected lifespan: Rated for 20 to 30+ growing cycles under normal conditions, or roughly 18 to 24 months of regular use with proper care.
Normal wear: May develop cosmetic stains with certain varieties (beets, purple radish). This doesn't affect performance.
When to replace:
- Torn or deeply cut silicone
- Excessive wear or degradation
- Loss of structural integrity or flexibility
Important note: Our 1.2mm silicone is virgin food-grade platinum-cured silicone with a fiberglass mesh core. It's BPA-free, FDA compliant per 21 CFR 177.2600, and LFGB Tested & Compliant. The fiberglass core is food-safe and provides structural support, but it's another reason to avoid cutting or damaging the silicone.
Replacement silicone available here.
Production Capacity and Cost Analysis
How Much Can You Grow?
Single tray capacity: 2 to 4 ounces of fresh microgreens per harvest.
Growing timeline: 7 to 14 days from seed to harvest (most varieties).
Family of 3 to 4: One tray lasts approximately 3 to 4 days.
Monthly production (rotating 3 trays):
- Harvest a fresh tray every 3 to 4 days
- Approximately 6 to 8 trays per month
- 12 to 32 ounces of fresh microgreens monthly
Cost Per Grow (Silicone Method)
Initial investment:
- 7x14 Tray Kit: visit the product page for current pricing
- Seeds for first grow: $5 to $10
Per-grow costs:
- Seeds: $2 to $5 per tray
- Electricity (windowsill): $0
- Electricity (grow light, 12 hours/day): $0.10 to $0.25 per grow
- Nutrients: $0.50 to $1.00 per grow
Total per tray: $2.50 to $6.00 depending on variety and setup.
Cost per ounce: Approximately $1.00 to $1.50.
Grocery store comparison: Organic microgreens cost $25 to $40 per pound ($4 to $6 per ounce).
Savings: 70% to 85% compared to store-bought organic microgreens.
Cost Per Grow (Soil/Coco Method)
Per-grow costs:
- Seeds: $2 to $5 per tray
- Soil or coco coir: $1.50 to $2.50 per tray
- Electricity: $0.10 to $0.25 per grow
- Nutrients (coco only): $0.50 to $1.00 per grow
Total per tray: $4.00 to $8.00.
Cost per ounce: Approximately $1.50 to $2.50.
Note: Silicone method becomes more economical after just 2 to 3 grows since the medium is reusable for 20 to 30+ cycles.
Troubleshooting Common Issues
For a deeper look at common problems, check out our top microgreen growing mistakes guide and our free troubleshooting PDF.
Mold Growth
Causes:
- Overwatering
- Poor air circulation
- Too much humidity during germination
Solutions:
- Reduce misting frequency
- Don't leave water pooling on seeds or medium
- Position near gentle airflow (not direct fan)
- Remove humidity dome earlier if mold appears
Not sure if it's mold or root hairs? Our mold vs. root hairs guide walks you through how to tell the difference.
Seeds Not Germinating
Causes:
- Old or low-quality seeds
- Insufficient moisture
- Too much weight on seeds
- Wrong temperature (too cold)
Solutions:
- Use fresh, quality seeds from reputable suppliers
- Mist more frequently during germination
- Check that dome is making contact but not crushing seeds
- Keep in room temperature area (65 to 75°F ideal)
Weak, Leggy Growth
Causes:
- Left in humidity dome too long
- Insufficient light
- Overcrowding (too many seeds)
Solutions:
- Remove from dome as soon as plants are 1 to 2 inches tall
- Move closer to light source or add grow lights (see our complete lighting guide)
- Reduce seeding density next grow
Yellow or Brown Leaves
Causes:
- Nutrient burn (too much fertilizer)
- pH imbalance
- Overwatering
Solutions:
- Reduce fertilizer concentration
- Check and adjust pH to 5.5 to 6.5 range
- Let medium dry slightly between waterings
Root Growth Issues
Causes:
- Inconsistent watering
- Water level too high or too low
- Contaminated growing medium
Solutions:
- Maintain consistent water level in reservoir
- Water should just touch bottom of mesh tray
- Properly sanitize medium between grows
Frequently Asked Questions
Can I grow microgreens in this kit without grow lights?
Yes! "We don't have grow lights. We just use the tray on a window sill, and even though the grows do take a bit longer, they still produce excellent results." — Customer Review
Place the tray on a bright windowsill (south-facing is best). Grows will take a few days longer than with artificial lights, but results are still excellent. Rotate the tray daily for even growth. If you decide to add lights later, check our complete lighting guide.
How many kits do I need for continuous harvests?
For a family of 3 to 4, we recommend starting with 2 to 3 kits. This allows you to:
- Start a new tray every 3 to 4 days
- Always have fresh microgreens ready
- Rotate different varieties
"I plan on purchasing 4 more of these trays once my new grow lights and shelving arrives so we can have a more constant variety of veggies in our household." — Customer Review
Can I grow sprouts in this kit?
Yes! The kit works great for sprouts as well as microgreens.
"So far I've used it to grow pea shoots and melon microgreens but also mung bean and urad dal sprouts, as well as a flat of Timothy hay for our guinea pigs to enjoy." — Customer Review
Do I need to use the silicone or can I just use soil?
You can use either! The kit includes two pieces of reusable silicone grow medium, but the trays work perfectly with soil or coco coir if you prefer traditional growing. Many growers keep both options available and choose based on the variety or their schedule.
How long will the reusable silicone last?
With proper care and cleaning, the 1.2mm silicone is rated for 20 to 30+ grow cycles, or roughly 18 to 24 months of regular use. "I don't see them wearing out anytime soon but it's nice to know I have a second just in case and can swap them out as I see fit." — Customer Review
Can I stack multiple kits?
Yes, the trays are designed to stack efficiently for storage. However, during growing, each kit needs its own space under light. Many growers use simple wire shelving to create a multi-level growing system with multiple kits. For a full rack build, see our professional grow rack setup guide.
Is this kit good for beginners?
Absolutely! This is our most popular kit for first-time growers specifically because it's simple, forgiving, and includes everything except seeds.
"This tray was my first step into the microgreen world. The setup is very easy, and watching OTG videos helped take the guesswork out of how much seed and water to use." — Customer Review
What varieties grow best in this kit?
Easiest for beginners:
- Broccoli
- Radish
- Mustard
- Kale
Great after you have a few grows under your belt:
- Peas
- Sunflower
- Arugula
- Cilantro (note: cilantro is not recommended on reusable silicone, stick with soil or coco)
More advanced:
- Basil
- Beets (not recommended on reusable silicone)
- Amaranth (needs a heat mat at 75°F if grown on the 1.2mm silicone)
Some seeds are not compatible with the reusable silicone grow medium. Learn more here: Which Microgreen Seeds Work on Reusable Grow Mediums?
Download our free variety guide for complete seeding rates and growing tips.
Tips from Experienced Growers
"Check Water Every 2 to 3 Days, Not Daily"
"My work schedule fluctuates drastically from day to day so being able to simply check the water every 2-3 days is great. I don't have that option with the green trays and the plants would ultimately suffer due to my laziness and forgetfulness." — Customer Review
The reservoir system is forgiving. Once you get the hang of how much water your specific varieties drink, you can check every 2 to 3 days instead of hovering over your trays daily.
"The Reversible Dome is Genius"
Multiple customers mention the clever design of the dome serving double duty:
- Upside down: Weighted germination cover
- Right-side up: Humidity dome for stretching
"The reversibility of the humidity dome that can temporarily hold a mesh tray full of growing microgreens without crushing the roots during water changes" is particularly useful during maintenance.
"Start with Easy Varieties"
Don't try to grow everything at once. Start with broccoli or radish. They're fast, reliable, and forgiving. Once you've had success with the basics, branch out to more challenging varieties. Our broccoli microgreens guide is a great place to start.
"These Make Great Gifts"
"I haven't just been recommending this kit to friends. I've been gifting it!" — Customer Review
The 7x14 kit is the perfect gift for health-conscious friends, foodies, or anyone interested in growing their own food. The beautiful white trays look great on countertops, and the complete system means they can start growing immediately. Browse our full gift ideas collection.
Want to Go Deeper? Join the Microgreen Masterclass
If you've gotten the hang of the 7x14 kit and want to take your growing to the next level (bigger yields, more varieties, troubleshooting like a pro, or even turning microgreens into income), our Microgreen Masterclass is the most complete A-to-Z training we offer. 11 modules covering everything from seed selection to scaling production, drawn from our 7+ years of growing experience.
Next Steps: Start Growing Today
The 7x14 On The Grow Microgreen Tray Kit makes growing fresh, nutritious microgreens at home achievable for anyone, even if you've never grown anything before.
What You Need to Get Started:
✓ 7x14 Tray Kit: Everything except seeds
✓ Microgreen seeds: Start with broccoli or radish
✓ Light source: Bright windowsill or grow light
✓ Spray bottle: For misting seeds
✓ pH test kit (optional): For optimal nutrient uptake
Helpful Resources:
- Browse our complete Video Library
- Download free seeding guide
- Enroll in Microgreen Masterclass for in-depth training
- Join our private Facebook community
Ready to Upgrade Your Setup?
- Browse replacement reusable silicone for the 7x14
- Shop microgreen seeds at True Leaf Market
- View our full Amazon storefront
Related Blogs You Might Enjoy
- How to Grow Broccoli Microgreens
- How to Grow Pea Microgreens (Pea Shoots): A Complete Guide
- How to Start Growing Microgreens: A Beginner's Guide
- How to Grow Pea Microgreens on Various Trays
- Meet Our Reusable Silicone Grow Medium
- Which Microgreen Seeds Work on Reusable Grow Mediums?
- How to Clean and Sanitize Microgreen Trays and Reusable Mediums
- Why Are My Microgreens Moldy? Mold vs. Root Hairs Guide
- Top Microgreen Growing Mistakes & How to Avoid Them
- Complete Microgreen Lighting Guide
- Weight to Blackout Transition Guide
- Disadvantages of Microgreens: An Honest Look at the Downsides
"Having the ability to grow our own microgreens is a joyful experience and I don't think I would have ultimately pulled the trigger if it wasn't for this tray. OTG is an amazing small company and each order I have received from them has had a personalized handwritten note in it. These guys have treated me better than any other company I know." — Customer Review
We can't wait to see what you grow!
Happy growing!
-CJ & Mandi
Published: May 31, 2023
Updated: May 23, 2026
All content is property of On The Grow®, LLC
Hi, just to make it sure, there is no need to add more weight durring germination? Just the humidity home? if yes, what kind of block/weight do you use? Also for the blackout, is it better to cover the clear humidity dome with something dark? Thank you so much.
Hello Bob! Thank you for the kind words. The amount of times that the silicone can be reused really depends on the user and how you handle & care for it. For instance, I (Mandi) have reused my same 10) 1020 sheets for about 7 months now, and they still have LOTS of life in them. The main thing is make sure when you harvest, avoid cutting to close to the silicone as you can cut through it. And when ever you are cleaning / sanitizing, use silicone safe solutions that are also food-safe. Hope this helps!
good to see you back, new kit is apparently out of stock any idea when it will be available !!
Great stuff!! Really appreciate you sharing all your hard work and patience. Before I order some things , may I ask how many times can one reuse the silicone mats? Does it depend how they are harvested or how they are sanitized. Thank you.