
Microgreens Weight vs Blackout: When to Switch and Why
If you've ever stared at a tray of seeds wondering whether today is the day to pull the weight off, you're not alone. This is one of the most common questions we get from new growers, and the good news is your microgreens will literally show you when they're ready. No calendar required.
Today we're sharing exactly how we time the weight and blackout phases just by looking at the tray. But before we get into the visual cues, let's make sure we're on the same page about what these two steps actually are.
Brand new to growing? Start with our beginner's microgreens guide for a full overview of the process, or grab our 41-page Beginner's Guide PDF for a printable walkthrough.
Quick Answer: When to Move From Weight to Blackout
Remove the weight when you see more yellow seedling growth than dark seed hulls across the tray, and stems are just starting to bend under the pressure. This typically happens 2 to 4 days after seeding, depending on the crop and your environment. Then move into blackout for up to 24 hours to let stems stretch, or skip blackout entirely for taller varieties like sunflower. Watch the tray, not the calendar.
What Weight and Blackout Actually Means
Adding weight is the simple act of placing something on top of your microgreen seeds during germination to add resistance and trap humidity. We always use a tray first to evenly distribute pressure, then add weight on top of that if needed. For most crops we use around 7 pounds of weight. Stronger varieties like sunflower can easily handle up to 15 pounds.
Blackout is different. Instead of pressing down on the seeds, you're just blocking light. The most common way to do this is by flipping a second tray upside down on top of your grow tray, creating a dome that lets the microgreens stretch upward without any pressure.
So weight applies resistance. Blackout removes light. Two different jobs, two different stages.
Why We Use Weight
Adding weight during the first few days of germination gives you three big benefits.
The first is seed shell removal. As the seedlings push up against the weight, they help work those shells off across the tray. This is why you'll notice in our photos and videos that we rarely have seed hulls clinging to the leaves, even on sunflower, which is notorious for stubborn shells.
The second is stronger stems. When microgreens push against weight, they're getting a workout. It's wild to watch a tray of sunflower microgreens lift 15 pounds straight up. Just like resistance training for us, this kind of pressure builds stronger plants. It also happens naturally in nature when seedlings push through soil.
The third is more even germination. We ran an experiment back in 2020 testing this exact thing, and the results were clear. Trapping humidity under weight helps seeds germinate more uniformly across the tray.
Why We Use Blackout
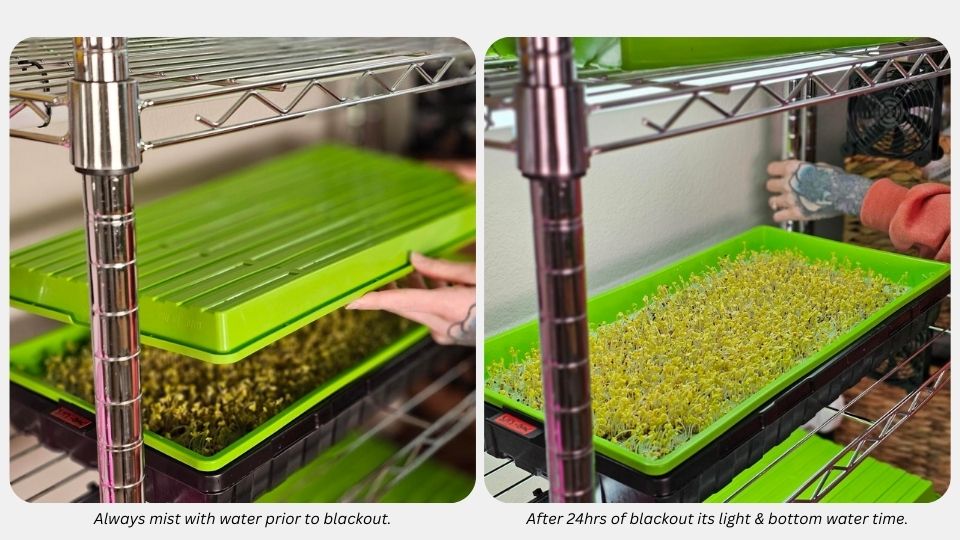
Once you move past the weighted phase, blackout takes over for a different reason. Without light, the plants stretch upward searching for it, which gives you a few real advantages.
You get taller crops, which makes harvest day much easier. That extra stem height is especially helpful for super short crops like basil, where every centimeter counts. You also pick up a little extra harvest weight from the added stem length. Just don't overdo it, because most of our customers preferred medium-length stems for appearance over extra-tall ones.
Fun fact: you can get the same stretching effect with a clear humidity dome instead of blackout. The heat and humidity trapped inside encourage the same upward growth without needing to block light. This is actually the method we use for our 7x14 Tray Kit.
How to Know When to Remove the Weight
This is where most growers get stuck, but it's actually the easiest part once you know what to look for. Forget counting days. Your tray will tell you.
Here's what we look for:
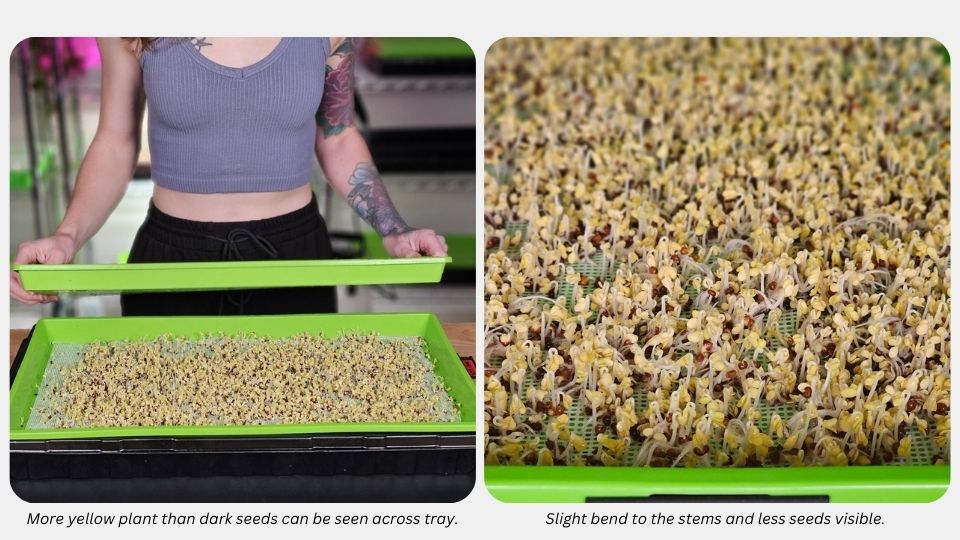
More yellow plant than dark seed hulls across the tray. This is the single most important cue. If the surface still looks like a sea of seeds with sprouts mixed in, it's not time yet. When the yellow growth dominates and the hulls have mostly been lifted off, you're ready.
Stems slightly bending. You'll see the seedlings starting to curl or bend under the weight. A little of this is fine and actually means it's go-time. Letting it continue too long is not what you want.
Watering matters here too. We water once or twice a day during the weighted phase, which keeps things humid and helps those seed hulls release as the plants push up.
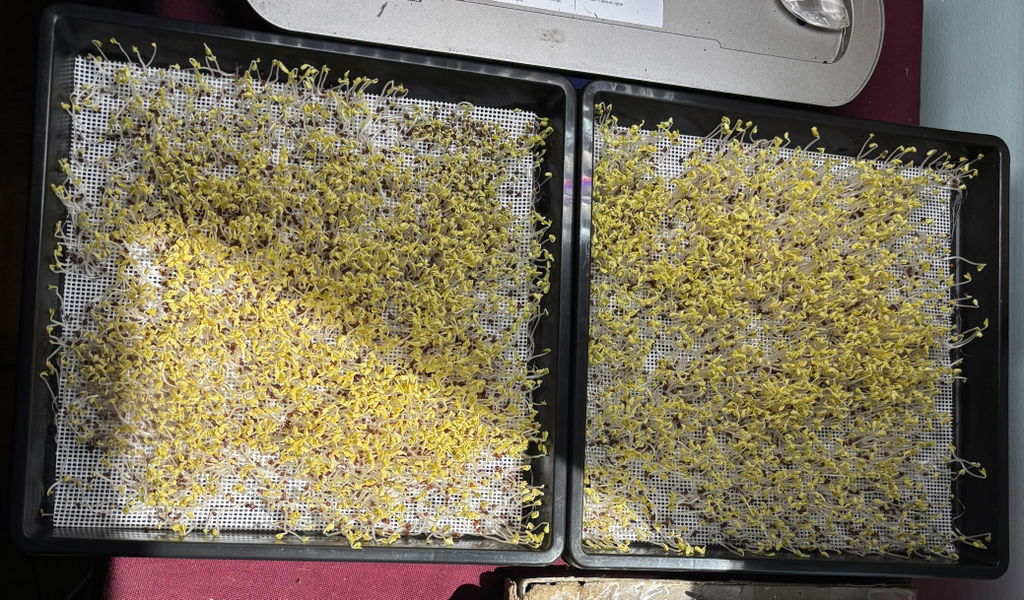
Your tray should look something like this when it's time to remove the weight:
How to Know When to End Blackout
Blackout is shorter and simpler. For most crops, 24 hours is the maximum. Some crops don't need blackout at all. Sunflower, for example, already produces strong tall stems and does fine going straight to light.
What you're watching for is stems that have stretched but are still standing upright on their own. If they start to lean or fall over, you've gone too long and the plants won't recover their strength. For shorter crops like basil, the extra centimeter or two of stem height from blackout is worth it. For taller varieties, you can often skip it entirely.
Crop-Specific Notes
Different microgreens behave differently under weight and blackout. Here are a few of the varieties we grow most often.
Broccoli: 2 to 3 days under 7 pounds of weight, then up to 24 hours of blackout if you want a little extra stem height. Broccoli is one of the most forgiving crops for this timing. For a full walkthrough, see our complete guide to growing broccoli microgreens.
Sunflower: Can handle up to 15 pounds of weight for 2 to 4 days. Often skips blackout entirely because the stems are already tall and strong. Sunflower is also one of the trickier crops for hull removal, which is exactly why weight is so important.
Peas: Aggressive roots and tall growth. 2 to 3 days under weight is plenty, and blackout is optional. For our full pea walkthrough, see our pea microgreens growing guide.
Radish: Fast germinator. 2 days under weight is usually enough, with optional short blackout.
Basil: Mucilaginous seed coating means no soaking and no heavy weight. Use a humidity dome or very light blackout, and don't add water directly on the seeds during germination.
Amaranth and celosia: Very small seeds that perform best with a heat mat at 75°F. Light weight only and very gentle blackout.
Common Mistakes to Avoid
A few things we see new growers run into:
Leaving weight on too long. If you see stems bent over flat or yellowing that's gone past healthy, the weight stayed on past its welcome. Better to remove a little early than a little late.
Skipping the tray in between. Putting weight directly on seeds without a tray to distribute it crushes some areas while leaving others untouched. Always use a tray as a buffer.
Forgetting to water. The weighted phase still needs moisture. Pull the weight off once or twice a day, water, and put it back.
Going too long in blackout. More stretch is not always better. Once stems start falling over, you've lost the structural strength that makes harvest day easy.
Pointing a fan at the tray during germination. A direct fan dries seeds out faster than you'd expect and tanks your germination rate. Save airflow for after the trays come out of blackout and into the light.
For more on common growing pitfalls, see our blog on top microgreen growing mistakes and how to avoid them.
Frequently Asked Questions
How long do you keep weight on microgreens?
Most crops need weight for 2 to 4 days during germination, but the exact timing depends on what you're growing and your environment. Instead of counting days, watch for the visual cues. When you see more yellow growth than dark seed hulls across the tray and stems starting to bend slightly, it's time to remove the weight.
Why didn't all my microgreen seeds germinate?
Uneven or slow germination usually comes down to humidity and watering during the germination phase. The most common cause is not watering enough or not trapping in enough humidity, which leaves some seeds without the moisture they need to sprout. A good misting device makes a drastic difference here, and so does using a top tray to hold humidity in. Make sure no fans are pointing directly at the trays or creating too much airflow during this stage, since that dries things out fast. On the flip side, watering too much can cause the same problem. If your seeds get slimy or develop a foul smell, you've gone too wet and the seeds can rot before they sprout.
Can you skip blackout for microgreens?
Yes, blackout is optional for many crops. Sunflower microgreens grow strong tall stems without it. Blackout is most helpful for shorter crops like basil where every extra centimeter of stem makes harvesting easier.
What happens if you leave microgreens in blackout too long?
The stems stretch too far and become weak, which leads to microgreens falling over and unable to support their own weight. For most crops we recommend no more than 24 hours of blackout to get the height benefit without sacrificing plant health.
Do all microgreens need weight during germination?
Most do benefit from weight, but the amount varies. Stronger varieties like sunflower can handle up to 15 pounds, while most other crops do well with around 7 pounds. The weight helps with seed hull removal, stronger stems, and more even germination across the tray.
How much weight should I put on microgreens?
For most varieties, around 7 pounds works well. Sunflower microgreens can handle up to 15 pounds because of their strong stems. The key is even pressure distribution, which is why we always use a tray on top before adding any additional weight.
Do microgreens grown on reusable silicone need weight?
Yes, the weight and blackout process works the same on our reusable silicone grow medium as it does on soil or coco coir. The only difference is that on silicone, the weight also helps press seeds into firm contact with the mesh surface during germination, which improves hull release as the plants push up.
What if I see mold instead of root hairs when I lift the weight?
About 85% of the time, white fuzz on microgreens is actually root hairs, not mold. For a full breakdown on how to tell the difference and what to do if it actually is mold, see our complete mold prevention and identification guide.
Wrapping Up
Timing the weight and blackout phases comes down to one thing: watching your tray instead of watching the calendar. Once you've grown a few rounds and you know what to look for, you'll be able to tell at a glance when it's time to make the switch.
If you want to dig deeper into specific timing for each crop, our free Microgreen Seeding Guides break it down variety by variety. And if you're curious about the trays and gear you see in our photos, you can find everything we use right here on the site.
Happy growing!
Related Blogs You Might Enjoy
- How to Grow Sunflower Microgreens: Complete Step-by-Step Guide
- How to Grow Broccoli Microgreens: A Complete Step-by-Step Guide
- How to Grow Radish Microgreens: The Fastest Beginner Crop
- How to Grow Pea Microgreens (Pea Shoots): A Complete Guide
-
Why Are Your Microgreens Staying Short? Common Causes and Fixes
- Types Of Microgreens: Popular Varieties to Grow
- Where to Start with Growing Microgreens: Complete Beginner's Guide
- How to Grow Microgreens in 10x20 Trays: Complete Guide
- How to Grow Pea Microgreens on Various Trays
- Microgreens and Mold: Complete Prevention & Identification Guide
- Top Microgreen Growing Mistakes and How to Avoid Them
- The Complete Microgreen Lighting Guide (7 Years of Testing)
- Meet Our Reusable Silicone Microgreen Grow Medium
Updated: May 23, 2026
All content is property of On The Grow®, LLC
A lot of my seeds have not germinated after 3 days…Should be time to move to black out but…lots of good roots from the seeds that did germinate…what did i do wrong?
Great info and progressive ideas, as usual. Thanks. San