
How to Build a Professional Microgreens Grow Rack: Complete Step-by-Step Guide
Want to build a professional-grade microgreens grow rack that can produce hundreds of pounds of fresh greens every month? This rack is exactly what we've used for years in our own operation, and it's what we recommend to anyone serious about growing microgreens at scale, whether you're starting a business or just want an efficient home setup.
This 6-shelf rack can hold 24 trays (four 10x20 trays per shelf) and costs approximately $450 to $550 to build with all new materials. You can also grow edible flowers, wheatgrass, herbs, and many other crops on this setup.
Watch our full YouTube video guide below, then follow the detailed written instructions to build your own rack:
Quick Answer: What This Build Includes
This professional microgreens grow rack is a 48-inch wide by 24-inch deep by 72-inch tall NSF wire shelving unit with 6 growing levels, 18 LED grow lights, 6 ventilation fans, a digital timer, and full cable management. It holds 24 standard 10x20 trays simultaneously, draws about 3.15 amps from a standard household outlet, and costs around $450 to $550 in materials. It's designed for commercial-scale microgreen production or serious home growers who want consistent, high-volume harvests year-round.
Looking for something smaller? Our beginner's microgreens guide covers a simpler home grow rack build that's perfect if this professional setup is more than you need. Also grab our Beginner's Guide to Growing Microgreens PDF for a 41-page walkthrough you can reference during your build.
Related Reading: Once your rack is built, check out our guides on How to Sanitize Microgreen Trays, What to Do With Grow Medium After Harvest, and our newest crop guide on How to Grow Broccoli Microgreens.
Complete Materials List
Click each item for direct links.
Shelving Components:
- 48" x 24" x 72" NSF Wire Shelving Unit - Seville Classics 5-tier with wheels (~$229)
- 2 Additional Wire Shelves (48" x 24") - Available at Seville.com to create 6 growing levels (~$50 to $80 for both)
Lighting:
- Barrina 20W LED T5 Lights, 12-pack ($80 to $90)
- We use three lights per shelf (18 lights total for 6 shelves)
For a deeper dive into our lighting setup and 7 years of testing, check out our complete microgreen lighting guide.
Ventilation:
- AC Infinity 120mm Fans (2-pack), $26.99 per 2-pack, need 3 packs for 6 fans (~$81 total)
- Extension cord with USB outlets (for powering fans)
Power Management:
- Dual-Outlet Timer, digital programmable (~$15 to $20)
- Triple-outlet extender or outlet multiplier (~$10 to $15)
- Heavy-duty extension cord, at least 15 amps (~$15 to $20)
Assembly Tools and Accessories:
- Rubber mallet (~$10 to $15)
- Zip ties, 50-100 count (~$5 to $10)
- Wire clippers or scissors (~$5 to $10)
- Wire Shelf Liners (4-pack), Optional but recommended (48" x 18", need 6 total = 2 packs, ~$105, or look for cheaper brands ~$60 to $80)
Trays and Growing Supplies (not included in build cost):
- 10x20 Microgreen Trays, Bootstrap Farmer 8-pack $94.97
- Silicone Reusable Grow Mediums, available in 2-packs ($15.97) or 10-packs ($54.97) for 10x20 size
- Alternative: coco coir bricks or potting soil (disposable options)
- Microgreen seeds from True Leaf Market
Total Build Cost Breakdown:
Essential Components:
- Rack: $229
- 2 Extra shelves: $50 to $80
- Lights (12-pack): $80 to $90
- Fans (3 two-packs): $81
- Timer and electrical: $40 to $55
- Tools and zip ties: $20 to $35
- Subtotal: $500 to $570
Optional but Recommended:
- Shelf liners: $60 to $105
Total Build Cost: $450 to $550 for materials only (without shelf liners). Total with Liners: $560 to $675.
You can save money by checking Craigslist, Facebook Marketplace, or restaurant supply liquidation sales for NSF wire shelving. We've seen used racks for $100 to $150.
Step 1: Assemble the Base Shelf

Start by attaching the wheels to the four shelf legs. Each leg has hollow, threaded inserts at the bottom where the caster wheels screw in. We always use wheels because it makes cleaning underneath the rack and rearranging your grow space much easier.
Assembly Process:
- Screw wheels into all four shelf legs.
- Take the black connector pieces and snap them around each leg at your desired height for the bottom shelf.
- Make sure "TOP" marking faces upward.
- You'll hear a click when properly seated.
- Critical: Match the height on all four legs by counting the rings.
- Slide the first wire shelf onto the legs through the connectors.
- Use your rubber mallet to gently tap the shelf, ensuring it's fully seated.
- Tap evenly to avoid misalignment.
- Don't hit too hard or you'll knock the connectors out of place.
The bottom shelf is now complete and should sit level with all four connectors properly engaged.
Step 2: Stack Additional Shelves
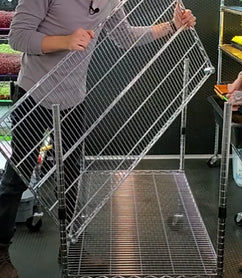
With the bottom shelf in place, repeat the connector and shelf process for the remaining levels.
Our Preferred Spacing:
We use 9 to 10 inch spacing between shelves instead of the standard 12 inches. This gives us 6 growing levels instead of 5, maximizing production per square foot. The trade-off is you can't grow tall crops like mature peas, but it's perfect for standard microgreens.
Alternative configurations that work well:
- Six shelves at 10" spacing (standard microgreens)
- Three shelves at 10" spacing + two shelves at 14" spacing (mix of microgreens and pea shoots)
- Five shelves at 12" spacing (traditional setup)

Adding the Shelf Extenders:
After you've installed your first 2 to 3 shelves, you'll need to add the second half of the legs to build upward:
- Use the leg extension connectors (included with your rack).
- Screw them onto the threaded inserts at the top of your current legs.
- Attach the upper leg sections.
- Pro tip: Have a second person help lift and position the upper shelves. They're awkward to handle alone.

Continue adding connectors and shelves until you've reached your desired number of growing levels. Always double-check that your shelf heights are even by counting the rings on the legs.
Step 3: Install Ventilation Fans

Fans are critical for preventing microclimates, reducing mold risk, and ensuring even temperature distribution. The LED lights create heat pockets, and stagnant air invites fungal problems.
Fan Positioning: Center of each shelf, blowing horizontally across the trays. This creates air circulation without directly blasting delicate microgreens.
Installation Steps:
Option 1: USB-Powered

- These fans attach directly with zip ties. No modifications needed.
- Thread two zip ties through the fan mounting holes.
- Loop zip ties over the wire shelf.
- Position fan in the center of the shelf.
- Tighten and trim excess zip tie length.
- Plug USB connector into extension cord with USB ports.

Option 2: AC Infinity Fans (Daisy-Chain)
- Remove anti-vibration rubber knobs from the four corners using a screwdriver.
- This exposes mounting holes for zip ties.
- Thread zip ties through top two mounting holes.
- Loop around wire shelf and secure firmly.
- Route the USB cable toward your power source.
- Leave the speed controller accessible on the side.
- Daisy-chain fans from top to bottom by connecting USB cables.
- Manage cables with zip ties to prevent tangling.

Fan Settings:
- Run continuously 24/7 on HIGH setting
- Don't put fans on timers. Consistent airflow prevents mold
- Never point fans directly at trays or greens
Watch our video if you need visual guidance on fan installation. It's easier to see than describe.
Step 4: Attach LED Grow Lights
We use three 20W Barrina LED lights per shelf, which provides excellent coverage for four 10x20 trays.
Light Installation:
-
First Light: Take one light and position it at the front edge of a shelf.
- The lights come with triangular connector clips.
- Slide these clips through the wire shelf grid.
- The light will hang securely without any zip ties.
- Do this on both ends of the light.

-
Second Light: Position in the middle of the shelf near your fan.
- Use the same clip method.
- Space evenly from the first light.

-
Third Light: Position at the back edge of your shelf.
- Because this light won't daisy-chain to another light, use a zip tie to secure it for extra stability.
- This prevents it from sagging over time.

-
Daisy-Chain Connection:
- Connect the first and second lights using the built-in connectors.
- Connect the second and third lights.
- Only the first light in the chain needs to plug into power.
Repeat this process for all six shelves. You'll end up with 18 total lights.
Step 5: Electrical Setup and Timer Configuration
This is where people often have questions, so let's address electrical safety first.
Electrical Load Calculation
Lights: 18 lights × 20 watts = 360 watts
Fans: 6 fans × 3 watts = 18 watts (approximately)
Total: 378 watts
At 120V, this draws approximately 3.15 amps, well within the safe range for a standard 15-amp household circuit. A single outlet can handle this rack with no issues.
However: Make sure nothing else high-draw is on the same circuit (space heaters, air conditioners, hair dryers, etc.).
Power Setup

-
Mount Extension Cord:
- Run a heavy-duty extension cord along the top or side of your rack
- Use zip ties to secure it to the shelf frame
- Keep it away from potential water spills
- Make sure the cord is long enough to reach your outlet without tension
-
Connect Timer:
- Plug your dual-outlet timer into the extension cord
- One side controls all the lights
- The other side can control a second rack or remain open

-
Connect Outlet Multiplier:
- Plug a triple-outlet extender into the timer
- This allows all three daisy-chained light sets to plug into one timer
- All 18 lights turn on and off simultaneously
-
Connect Fans Separately:
- Plug fans directly into USB ports on your extension cord
- Fans should run 24/7 (NOT on the timer)
- If using AC Infinity fans, the daisy-chain powers all six fans from one USB connection

Timer Settings
Lights: 16 to 17 hours ON, 7 to 8 hours OFF
- We use 17 hours ON, 7 hours OFF
- Set lights to turn off during peak electricity hours if you're on tiered pricing
Electricity Cost: Running three 20W lights costs approximately $0.10 to $0.15 per day per shelf, or about $0.60 to $0.90 per day for the entire six-shelf rack (varies by location).
Step 6: Cable Management
Take the time to make your rack look professional. Good cable management prevents tripping hazards, water damage to cords, and makes troubleshooting easier.
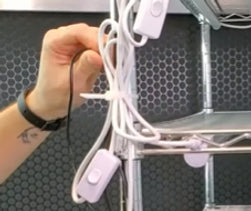
Cable Management Steps:
- Group wires from each shelf together.
- Create neat loops with the excess wire.
- Use zip ties to bundle wires together.
- Secure wire bundles to the shelf frame.
- Keep all electrical connections elevated above tray height to avoid water damage.
- Trim excess zip tie ends with clippers for a clean look.
The difference between a messy rack and a professional setup is just 15 minutes of cable management. We do this on every single rack we build.
Step 7: Add Shelf Liners (Optional but Recommended)

Shelf liners serve two purposes:
- Catch debris and water drips from the shelf above
- Protect trays on lower shelves from soil, seed, and plant matter falling through wire gaps
We use either clear plastic liners or matte black liners. Both work great. You'll need six liners sized 48" × 18" (one per shelf).
Installation: Simply lay them on top of the wire shelf before adding your trays. Trim to size if needed.
Step 8: Final Systems Check
Before you start growing, verify everything is working correctly.
Power Test:
- ✓ Plug in extension cord
- ✓ Verify timer is set to 17 hours ON / 7 hours OFF
- ✓ Confirm all lights turn on simultaneously
- ✓ Check that all six fans are running
- ✓ Listen for unusual buzzing or electrical issues
Physical Test:
- ✓ Gently shake the rack. All shelves should be stable
- ✓ Check that all connectors are fully seated
- ✓ Verify shelf heights are level
- ✓ Confirm wheels roll smoothly
- ✓ Test cable routing. Nothing should snag when moving the rack
Safety Checks:
- ✓ All electrical connections are above tray height
- ✓ No exposed or frayed wires
- ✓ Extension cord is rated for the load
- ✓ Timer is easily accessible
- ✓ Fan speed controllers (if applicable) are reachable
You're now ready to start growing.
Is This Build Too Big for You? Try the Home Grow Rack Build
If 24 trays per cycle is more than you need, or if your budget doesn't quite stretch to a $450 to $550 build, we've got you covered. Our beginner's microgreens guide walks through a simpler home grow rack build that runs about a third of the cost and is perfect for personal household use or just getting started.
The home rack build is also a great starting point if you want to test the waters before investing in a full commercial setup. Many of our growers start there, get comfortable with the workflow, then upgrade to this professional rack once they're ready to scale up.
And while you're getting started, grab our free Beginner's Guide to Growing Microgreens PDF. It's a 41-page printable resource that covers everything from setup to harvest across soil, coco coir, hydroponic mats, and our reusable silicone grow medium. It's a great companion piece for either rack build.
Production Capacity and Economics
What This Rack Can Produce
Capacity: 4 10x20 trays per shelf × 6 shelves = 24 trays growing simultaneously
Rotation Schedule: With a 10 to 14 day grow cycle, you can harvest 24 trays every two weeks, or approximately 48 to 60 trays per month.
Tray Options for This Rack
This rack works with any standard 10x20 trays:
- Bootstrap Farmer Heavy-Duty Trays, our top recommendation for durability (8-pack: $94.97)
- Shallow 10x20 trays (1" depth), best for reusable grow mediums
- Standard 10x20 trays (2" depth), ideal for soil and coco coir grows
- 10x10 trays, you can fit 8 per shelf if you want smaller grow batches
Growing Medium Options
Disposable Mediums:
- Coco coir, $1.00 to $1.50 per tray (5lb bricks cost $7 to $12 and yield 7 to 10 trays each)
- Potting soil, $1.50 to $2.50 per tray
Reusable Option:
- Silicone reusable grow mediums, $5.50 per sheet (10-pack pricing), reusable for hundreds of grows
Cost Breakdown for Silicone:
- 10-pack (10x20 size): $54.97 = $5.50 per sheet
- 2-pack (10x20 size): $15.97 = $7.99 per sheet
- After 20 cycles: $0.28 per tray (10-pack pricing)
- After 50 cycles: $0.11 per tray
- After 100 cycles: $0.055 per tray
With proper care and cleaning, silicone mediums can last for hundreds of grow cycles. We've been using the same sheets for 9+ months with repeated monthly use.
Initial Investment for Full Rack (24 trays):
- Disposable route: $1.00 to $2.50 per tray, ongoing cost forever
- Silicone route: $132 upfront (24 sheets using 10-pack pricing), then just cleaning and nutrient costs
The silicone reusable grow mediums pay for themselves after about 3 to 5 rotations compared to buying coco coir each time.
For detailed information on using and maintaining silicone grow mediums, see our Complete Guide to Silicone Reusable Grow Mediums.
Revenue Potential (If Selling)
When we were actively selling microgreens in 2019, we aimed for $20 to $45 per tray depending on variety and market. Current market rates in 2026 support even stronger pricing for quality, locally-grown microgreens.
Conservative Estimate (Common Varieties: Broccoli, Radish, Pea):
- 24 10x20 trays × $20 = $480 per rotation
- 2 rotations per month = $960/month from one rack
Mid-Range Market (Quality Local Producer):
- 24 10x20 trays × $30 = $720 per rotation
- 2 rotations per month = $1,440/month from one rack
Premium Market (Specialty Varieties, High-End Restaurants):
- 24 10x20 trays × $45 = $1,080 per rotation
- 2 rotations per month = $2,160/month from one rack
For more on selling to restaurants and chefs specifically, check out our guide on the best microgreens for restaurants.
Production Costs (Coco Coir Example):
- Coco coir: $1.25 per tray × 24 = $30
- Seeds: $3.50 average per tray × 24 = $84
- Electricity: $22/month (average)
- Total: $136 per rotation
Profit Margins:
- Conservative pricing ($20/tray): $480 revenue - $136 costs = $344 profit per rotation (72% margin)
- Mid-range pricing ($30/tray): $720 revenue - $136 costs = $584 profit per rotation (81% margin)
- Premium pricing ($45/tray): $1,080 revenue - $136 costs = $944 profit per rotation (87% margin)
This is why microgreens can be such a profitable crop. The margins are excellent if you have consistent sales channels and quality production.
Personal Production (Growing for Yourself)
If you're growing for personal use, this rack produces an almost absurd amount of fresh greens. We currently grow for ourselves and family, and one rack provides:
- Fresh salad greens daily
- Smoothie additions
- Cooking ingredients
- Gifts for friends and neighbors
Cost per pound: We calculated it costs approximately $2.50 to $3.50 to grow one pound of organic broccoli microgreens including seeds, coco coir, and electricity. Compare that to $25 to $50 per pound at grocery stores or farmers markets. You're saving 90% or more by growing your own. And if you are using reusable grow mediums, the cost is even lower over time.
With a 6-shelf rack producing 48 to 60 trays per month, you could easily grow 30 to 50 pounds of microgreens monthly for less than what a single pound costs at retail. The savings add up incredibly fast, not to mention you're getting the freshest, most nutritious greens possible.
For a deep-dive into nutrition specifically, see our blog on sprouts vs microgreens nutritional benefits.
Frequently Asked Questions
Can I safely put all this electricity on one outlet?
Yes. As calculated above, this rack draws approximately 3.15 amps, well within safe limits for a standard 15-amp household circuit.
Important: Don't plug this rack into the same circuit as:
- Space heaters
- Window AC units
- Hair dryers
- Power tools
- Other high-draw appliances
If you're ever unsure about your electrical setup, consult a licensed electrician. Always do your own research and make sure your home or building's electrical system can safely support this setup.
How do I get power to my rack if it's in a garage or shed?
Options:
- Run a dedicated extension cord from your house (15 to 20 amp rated)
- Have an electrician install an outlet in your growing space
- Use a generator (for completely off-grid setups)
Never use a lightweight extension cord. Invest in a 12-gauge or 14-gauge heavy-duty cord rated for continuous use. If you're ever unsure about your electrical setup, consult a licensed electrician.
What if my ceilings are too low for a 72" rack?
- Buy a 60" tall rack instead (fits 5 shelves comfortably)
- Use 12" shelf spacing instead of 10"
- You'll fit 20 trays instead of 24
Can I use different lights?
Yes, but make sure they're:
- Full-spectrum (6500K color temperature ideal)
- At least 20 watts per 4-foot light
- Daisy-chainable to reduce outlet usage
We've tested many lights. The Barrina T5 LEDs have been reliable for 7+ years across dozens of racks.
Do I need fans if my grow room has good airflow?
Yes. Even in well-ventilated rooms, you need targeted airflow across the trays. The lights create heat pockets, and microclimates form between closely-spaced shelves. Fans are non-negotiable for consistent, mold-free grows.
Should I add wheels or keep legs stationary?
We strongly prefer wheels:
- Easier to clean underneath
- Ability to rearrange your grow space
- Simplifies maintenance and tray access
Locking casters prevent the rack from rolling when you don't want it to.
Can I grow anything other than microgreens on this rack?
Absolutely. This rack works great for:
- Wheatgrass and cat grass
- Edible flowers
- Herb starts and seedlings
- Lettuce and salad greens
- Sprouts (if using sprouting trays)
- Mushroom fruiting (with proper humidity)
Is this rack overkill if I just want to grow for my family?
It can be. If you're growing only for personal use, you may want to start with the smaller home grow rack build covered in our beginner's microgreens guide. That build is roughly a third of the cost and well-suited to households that don't need 30+ pounds of microgreens per month.
Safety Reminders
Electrical Safety:
- Never handle electrical components with wet hands
- Keep all power connections elevated above tray level
- Use GFCI-protected outlets if available
- Unplug during maintenance
- Always verify that your building can handle the setup
Water Safety:
- Bottom-water trays when possible to avoid splashing
- Immediately wipe up any water spills near electrical components
- Keep a towel nearby during watering
- Don't spray water directly at fans or lights
Structural Safety:
- Don't overload shelves beyond their weight rating
- Keep heavy items on lower shelves
- Ensure rack is level before adding trays
- If rack wobbles, recheck all connectors and leg positioning
Next Steps: Growing Your First Crop
Your rack is built. Now it's time to put it to use.
Recommended Reading:
- Where to Start with Growing Microgreens: Complete Beginner's Guide, seed selection, varieties, and first steps
- How to Grow Microgreens in 10x20 Trays, step-by-step growing instructions
- How to Grow Broccoli Microgreens, our newest crop-specific guide
- How to Grow Pea Microgreens (Pea Shoots): A Complete Guide
- How to Grow Microgreens: Complete Step-by-Step Guide
- The Best Microgreen Growing Advice
- How to Clean and Sanitize Microgreen Trays, essential maintenance
- What to Do With Grow Medium After Harvest, disposal and composting
- Microgreens and Mold: Complete Prevention Guide
Supplies You'll Need:
- Microgreen trays
- Reusable grow mediums (or coco coir/soil)
- Seeds from True Leaf Market
- Spray bottle for watering
- Harvest knife or scissors
Free PDFs and Education:
- Beginner's Guide to Growing Microgreens PDF, our 41-page printable resource
- Free Tray-Specific Microgreen Seeding Guide PDF
- Free Fertilizer Ratio Guide for Microgreens
- Free Microgreen Troubleshooting, FAQ & Lingo PDF
Join Our Community:
- Subscribe to our YouTube channel for detailed grow videos
- Take the Microgreen Masterclass for comprehensive training
- Join our Facebook community to connect with other growers
Related Blogs You Might Enjoy
- How to Grow Broccoli Microgreens: A Complete Step-by-Step Guide
- Where to Start with Growing Microgreens: Complete Beginner's Guide
- How to Grow Microgreens in 10x20 Trays Complete Guide
- Meet Our Reusable Silicone Microgreen Grow Medium
- The Complete Microgreen Lighting Guide (7 Years of Testing)
- Microgreens and Mold: The Complete Guide to Prevention, Identification, and Treatment
- Top Microgreen Growing Mistakes and How to Avoid Them
- Case Study: Coco Coir vs. Reusable Grow Medium
- How to Build a DIY NFT Hydroponic System: Complete Build-to-Harvest Guide
- How to Raise Black Swallowtail Butterflies in a Container Garden
Building this rack is one of the best investments you can make in your microgreens journey. It's paid for itself many times over for us through both sales and personal use. We've helped thousands of people build these racks, and they consistently deliver great results.
Growing microgreens has genuinely changed our lives and connected us with an amazing community. Whether you're building this rack to start a business, supplement your family's diet, or just enjoy the process of growing food, you're going to love what this setup can do.
Now get building, and reach out if you have any questions.
Happy growing!
CJ & Mandi
Published: September 10, 2020
Updated: May 23, 2026
All content is property of On The Grow®, LLC
Great video
Can you safely put all that electricity in one outlet?
How do you get electricity to the trailer?
Tgank you for your videos
Do well explained
Can you safely put all that electricity in on outlet ?
How do you get electricity to your trailer?