
How to Grow Microgreens Using the Kratky Method (No Pumps, No Daily Watering)
In today's world, where health and nutrition are increasingly prioritized, microgreens stand out as nutrient-rich, flavorful little greens. Although many enjoy the process of growing and caring for their plants, it can be somewhat time-consuming, and it's easy to overlook watering them, especially for those with busy schedules.
Additionally, some individuals prefer a more laid-back approach to gardening. While automated hydroponic systems such as NFT channels or flood and drain tables are options, they often require significant space, may produce more microgreens or veggies than what some need, and can be somewhat expensive to set up. This is where the Kratky method, a passive hydroponic system, offers a simple and efficient way to grow nutritious plants at home.
If you're brand new to growing, start with our Beginner's Guide to Growing Microgreens or grab the $3.99 printable Beginner's Guide PDF.
Quick Answer: How Do You Grow Microgreens With the Kratky Method?
The Kratky method is a passive hydroponic system that grows microgreens suspended over a nutrient-rich water reservoir, with no pumps, electricity, or daily watering required after germination. The setup uses three 10x20 trays: a 1-inch no-hole tray on top (for humidity), a 1-inch mesh tray in the middle (for planting), and a 2-inch no-hole tray on the bottom (the water reservoir). Seed your medium, germinate under weight for 3 to 5 days, then transfer to light and fill the bottom reservoir with nutrient solution (we recommend Ocean Solution 2-0-3 at 0.5 oz per gallon, pH balanced to 5.5 to 6.0). Verify the roots are touching the water, then leave it alone. You'll harvest in another 4 to 8 days depending on the variety. The Kratky method is ideal for busy growers, beginners, and anyone wanting a low-maintenance setup that can survive a weekend trip away from home.
Understanding the Kratky Method
For those new to the concept, the Kratky method is a hydroponic technique pioneered by Dr. Bernard A. Kratky at the University of Hawaii. This method involves growing plants suspended over a nutrient-filled water reservoir. Unlike the deep water culture (DWC) method, the Kratky method operates without electricity, negating the need for pumps and airstones. This characteristic simplifies the process, making it an excellent choice for beginners or anyone looking for a low-maintenance gardening solution. (For a deeper dive on DWC builds, see our DIY Mini DWC System guide.)
In hydroponic farming, the Kratky method is typically used for mature crops such as tomatoes, peppers, and cannabis. However, these crops, with their longer growth cycles, are more prone to root rot due to the lack of water aeration unless the reservoir is maintained properly.

The advantage of microgreens is their short growth cycle, typically ranging from 7 to 14 days, with the initial 3 to 5 days dedicated to germination for most varieties. This means the roots of the microgreens will only be suspended above the nutrient-rich water for about 4 to 8 days when using the Kratky method. And because we're using a scaled-down system for microgreens, the risk of encountering root rot common in mature crops is significantly reduced.
The Benefits of Using the Kratky Method for Microgreens
The primary advantage of using the Kratky method for microgreens lies in its largely hands-off approach to cultivation. As mentioned above, the initial 3 to 5 days (for most crops) is the germination phase, followed by a 4 to 8 day period (for most crops) of passive hydroponic growth. Essentially, your involvement is required during the germination phase, and once the seedlings are ready for light exposure, you simply fill the reservoir tray and ensure the roots are in contact with the water. From there, you're looking at a roughly 4 to 8 day stretch where your main task is merely to monitor their growth.
This approach conveniently allows for a minimal 2-day break, which can be wonderful for a weekend camping trip, or even an overnight trip somewhere with proper planning and timing. That, and it's a really affordable system that takes very little supplies and knowledge to make.
Essential Equipment for Kratky Method Microgreens Cultivation
The 3-tray Kratky setup:
- A single 1-inch deep tray without holes to maintain humidity during germination
- A single 1-inch deep mesh tray for planting
- A single 2-inch deep tray without holes serving as the Kratky method reservoir
It's critical for the planting tray to be shallow and the reservoir tray to be deeper to ensure a proper setup, allowing plants to hang above the water effectively. Otherwise, the system won't function properly.
Additional requirements:
- Growing medium (options include our reusable silicone grow medium, coco coir, or vermiculite)
- Ocean Solution 2-0-3 hydroponic fertilizer
- Premium microgreen seeds from True Leaf Market
- A light source, either natural or artificial (see our complete microgreen lighting guide)
The setup we'll discuss in this blog, which is also featured in our YouTube videos and social media, is our user-friendly 10x20 Kratky Hydroponics Tray Kit.
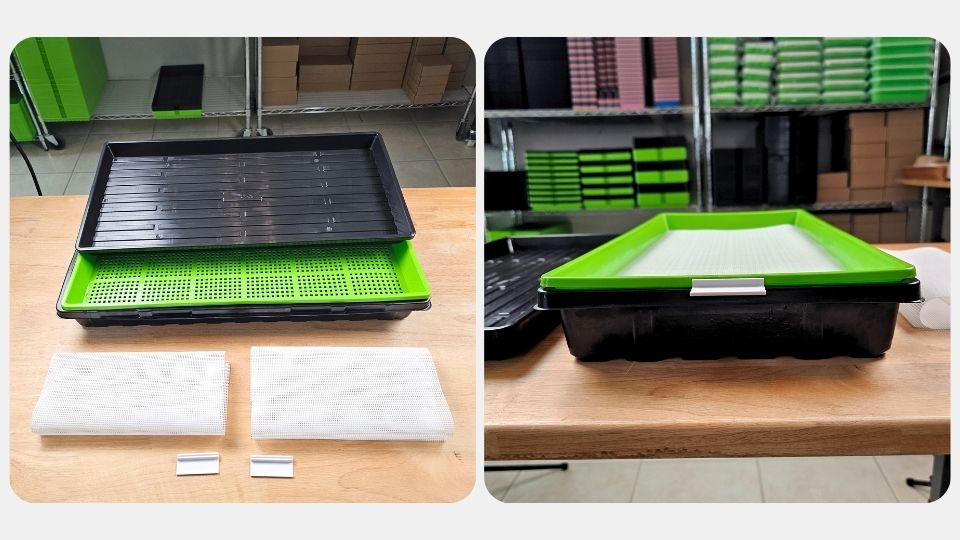
This kit includes all three necessary 10x20 trays, two of our reusable silicone grow mediums, and two tray clip labelers, providing a complete Kratky system setup for growing microgreens. While this kit offers convenience, individual components are also available for purchase, either through us or other suppliers.
How to Grow Microgreens Using the Kratky Method
Step 1: Tray Setup
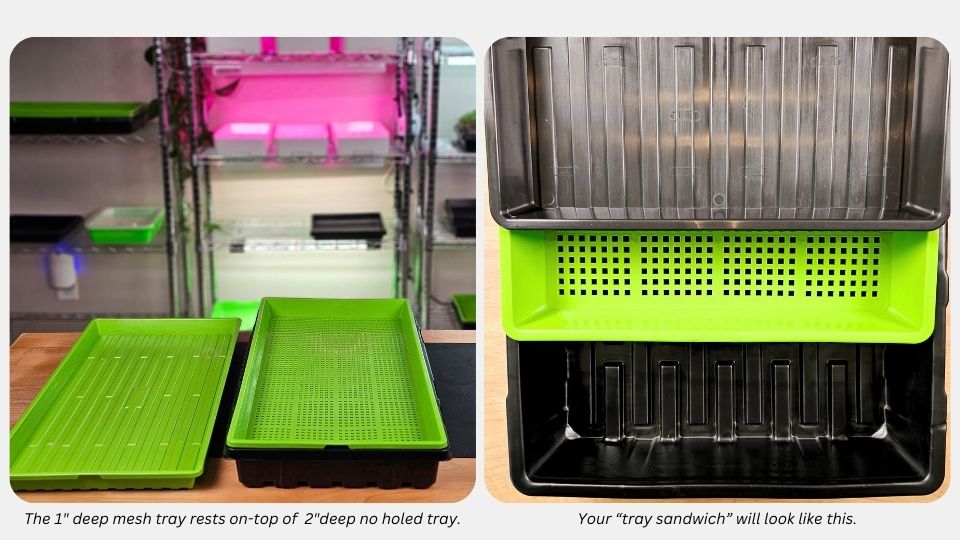
Make a tray sandwich. The 2-inch deep tray will be at the bottom, with the 1-inch deep mesh tray resting on top of it. Set aside the 1-inch deep no-hole tray for now.
Step 2: Grow Medium and Labeling
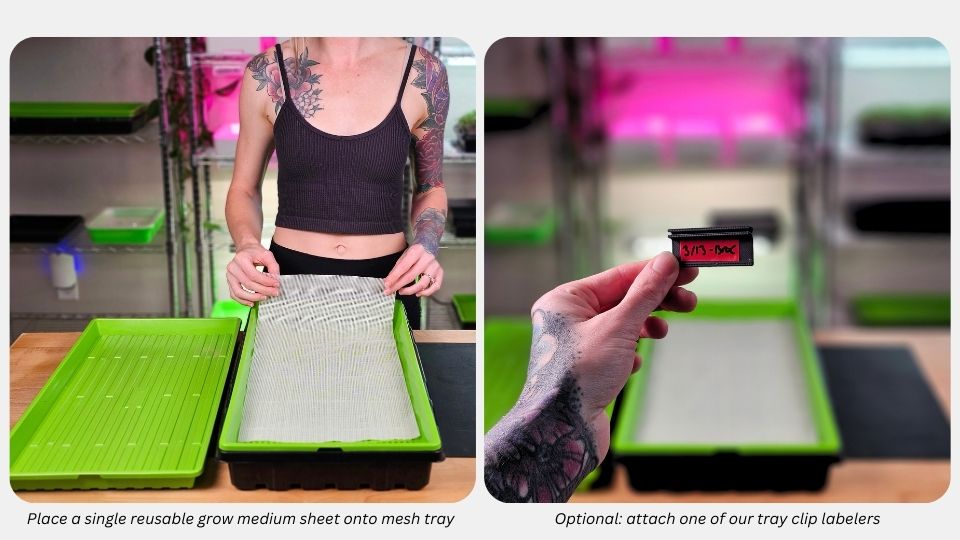
Once the trays are set up, we place one sheet of our reusable silicone grow medium onto the mesh tray. Now we're ready to seed the medium. This next step is optional, however, we attach one of our tray clip labelers to the tray so that we can write which crop we are growing and the date we started the tray.
Step 3: Seeding and Watering
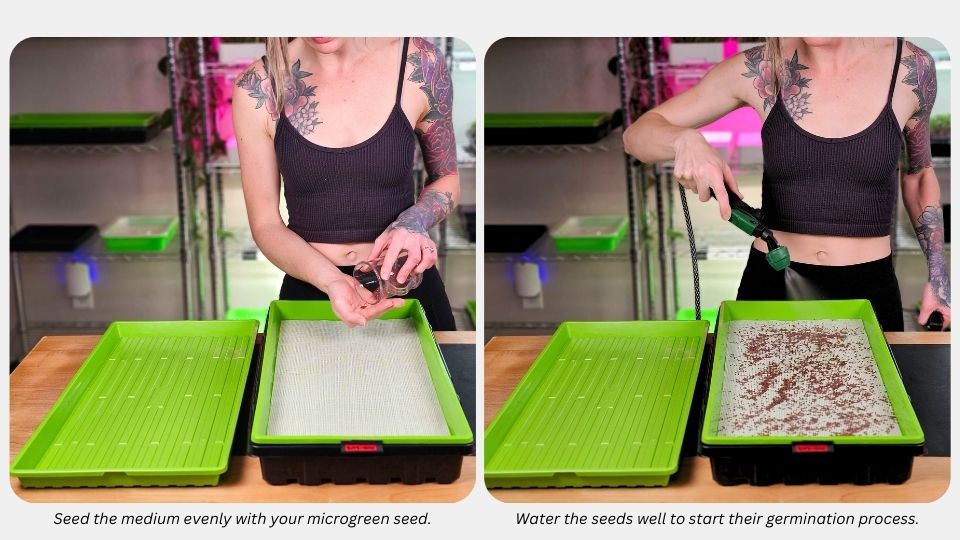
Seed the medium with your seed of choice. We're using broccoli microgreen seeds for this grow (see our How to Grow Broccoli Microgreens guide for a complete walkthrough on this variety). Since it's a 10x20 tray, we'll be using the suggested amount of seed from our Free Tray-Specific Microgreen Seeding Guide PDF for the tray size. Once the medium is seeded, give the seeds a good mist with regular water, making sure they look nice and moist.
Step 4: Trapping in Humidity and Germination

Now take the remaining no-hole 1-inch tray and place it on top of the seeds to trap in the humidity. You can also add some weight if you'd like. However, with this setup be cautious not to add too much weight, or it will cause the tray to bow in the middle and can also cause poor germination. In most cases, it's better to use no weight for this method.
Germination Continued
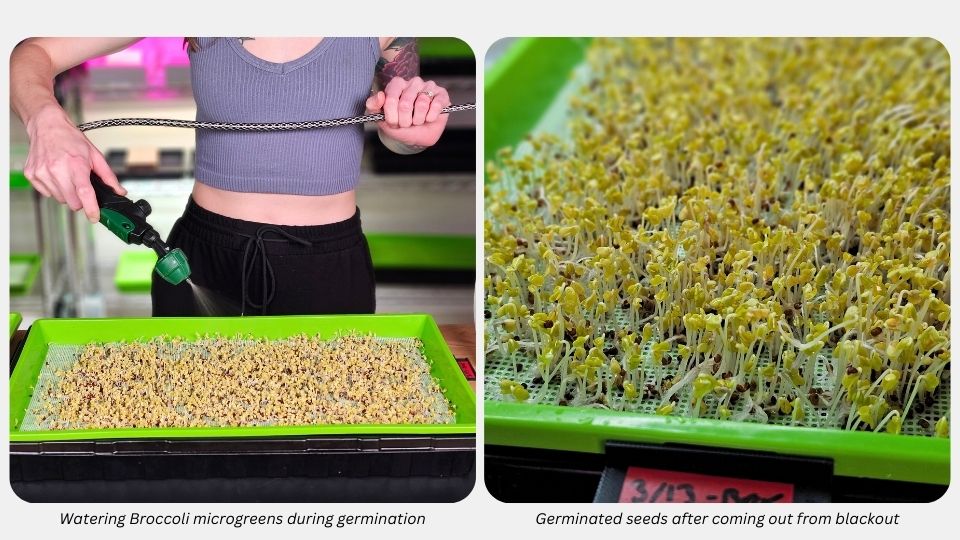
Going forward, you will mist 1 to 2 times per day with regular water, until your crops look like they are ready to transition from being under weight and into blackout. If you're curious to learn how to identify their readiness at a glance, be sure to read our blog Unlocking the Secret: Knowing the Right Time to Transition Microgreen Trays From Weight to Blackout. Typically, for most varieties this process takes 3 to 4 days total. After you are through the germination phases of being under weight and 24 hours of blackout, you are ready for the final steps.
Step 5: Into the Light
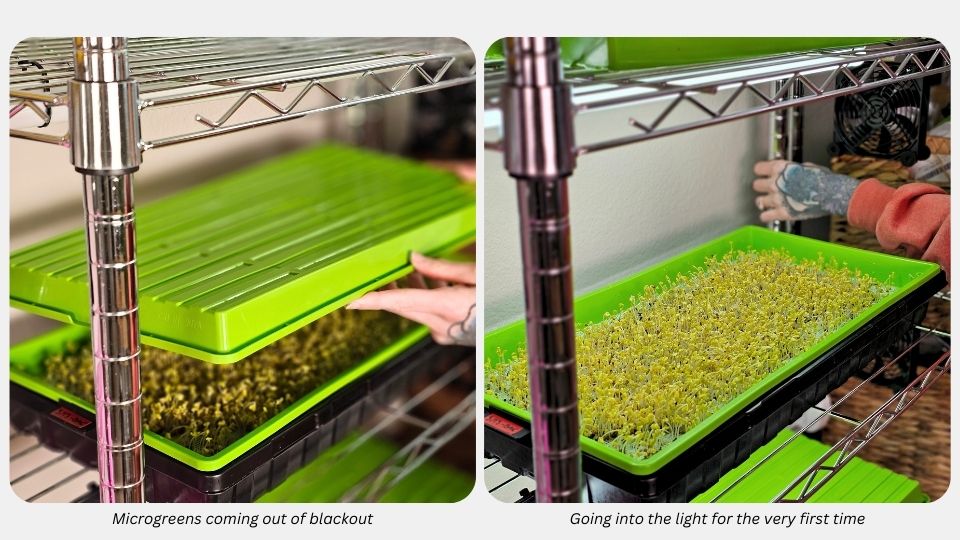
At this point in your microgreen grow, you are finished with the initial germination, and it's now time to introduce them to light for the very first time. We're using a smaller home grow rack setup with two 2ft LED lights per shelf as our light source in the photos. Both available on our Amazon storefront.
Step 6: Filling the Kratky Reservoir and Adding Nutrients
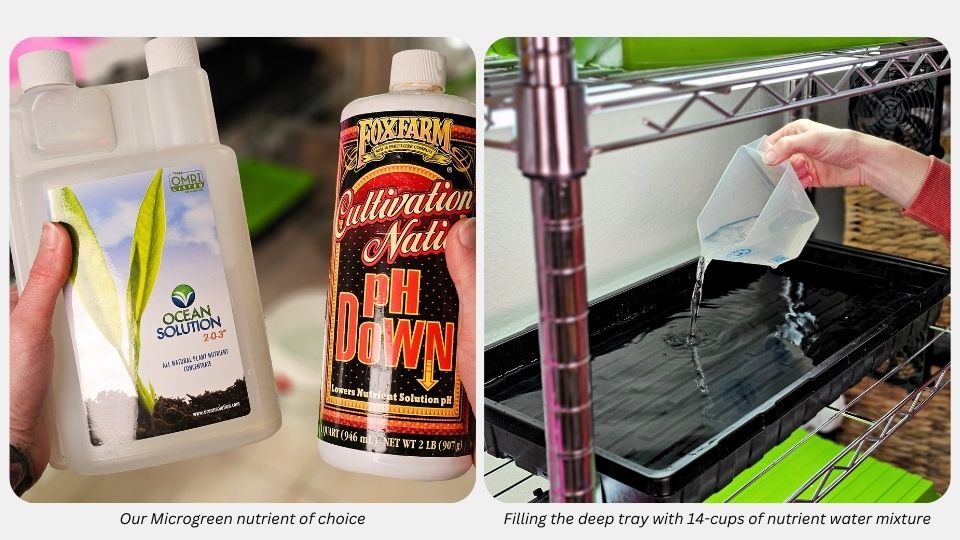
In a separate 3-gallon bucket, fill it with filtered tap water, then mix 1.5 oz of Ocean Solution 2-0-3 organic fertilizer (0.5 oz per gallon of water), then pH balance to the 5.5 to 6.0 range using pH up/down solutions available on our Amazon storefront.
You don't have to use the same fertilizer that we do, and if you're curious what other options there are for microgreens, we highly suggest reading our blog Best Fertilizers and Nutrients for Microgreens.
Once your nutrient water is mixed and ready for use, fill the 2-inch deep reservoir tray with 14 cups of the mixture, leaving roughly 1 to 2 inches from the top of the tray empty. This is so the roots have some breathing room.
Step 7: Root Drip Test

After filling the reservoir tray, check that all your roots are making contact with the water by lifting and tilting the tray back, as if to bottom water. You should see water droplets coming off all of the roots. Otherwise, add a little more water. This step is vital to having a successful grow. If your roots are not making contact, they will dry up, and cause your microgreens to die off.
Step 8: The Easy Part
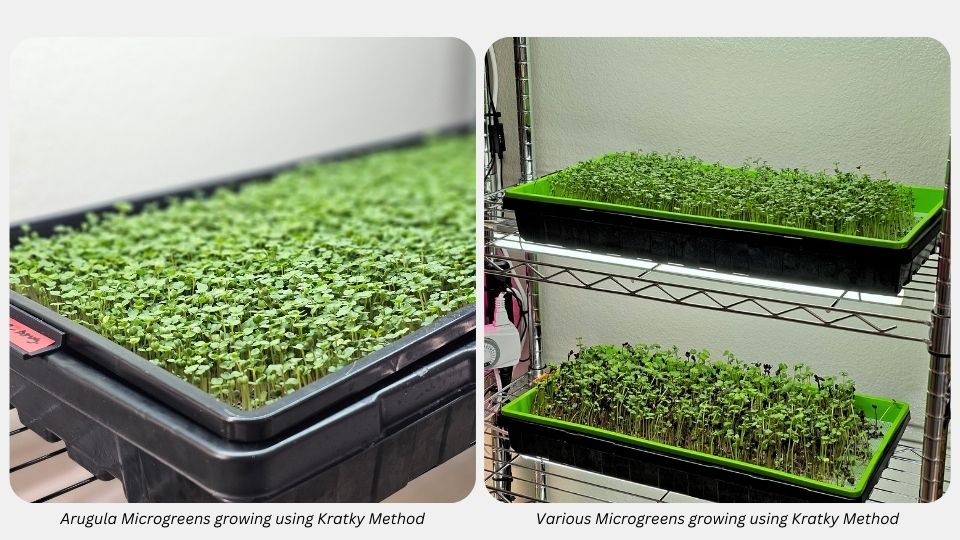
Once you have confirmed your roots are touching the water, everything is now passive, and you literally have nothing to do for a few days. We like to check in to see where the microgreens are at in growth, and if we need to top off the water. For most crops, we've found that we can make it all the way to harvest day without filling up again, typically 4 to 8 days. However, this part really depends on the crop you are growing as well as your grow environment, so be sure to do your own tests to learn the timing for you before stepping out. Once you see the development of true leaves on your canopy, it's time to harvest your microgreens.
Videos on Utilizing the Kratky Method
We have a complete series on growing microgreens using the Kratky method on our Video Library. Here's the main walkthrough:
Frequently Asked Questions About the Kratky Method for Microgreens
What is the Kratky method?
The Kratky method is a passive hydroponic technique developed by Dr. Bernard A. Kratky at the University of Hawaii. Plants are suspended above a reservoir of nutrient-rich water, and as the roots grow downward into the solution, they take up water and nutrients while the upper roots access oxygen from the air gap above. No pumps, airstones, or electricity required. Perfect for low-maintenance growing.
How long does it take to grow microgreens with the Kratky method?
Total grow time is typically 7 to 14 days from seed to harvest, similar to soil-based or coco coir methods. The first 3 to 5 days are spent in germination under weight or cover, followed by 4 to 8 days of light exposure with the roots suspended over the Kratky reservoir. Faster varieties like radish and broccoli are usually ready in 7 to 10 days, while slower varieties like sunflower can take up to 14 days.
Can you grow all microgreen varieties with the Kratky method?
Most common varieties grow well with the Kratky method, including broccoli, radish, kale, mustard, kohlrabi, peas, and sunflower. Mucilaginous seeds (basil, chia, flax, arugula) can also work but need to be seeded dry and misted lightly on top, never soaked. See our microgreen seed compatibility guide for a complete breakdown of which varieties perform best on a reusable silicone grow medium.
Do you need fertilizer for the Kratky method?
Yes, hydroponic nutrients are essential for the Kratky method since you're growing on an inert medium like the reusable silicone grow medium or vermiculite. We recommend Ocean Solution 2-0-3 mixed at 0.5 oz per gallon of water, pH balanced to 5.5 to 6.0. Other strong options include Masterblend 4-18-38, General Hydroponics MaxiGro, and Farmers Pride. See our best fertilizers for microgreens guide for full breakdown.
Can you leave Kratky microgreens unattended for a weekend?
Yes, that's one of the main advantages. Once you've completed the germination phase and filled the Kratky reservoir, your microgreens can typically grow unattended for 4 to 8 days. The reservoir holds enough water and nutrients to last the entire post-germination grow cycle, making the Kratky method ideal for busy growers, weekend camping trips, or anyone who doesn't want to water twice a day. Just verify the roots are touching the water before you leave.
What happens if the roots don't touch the water?
If the roots aren't making contact with the water in the reservoir, they will dry out and your microgreens will die off. This is the single most common failure point with the Kratky method. After filling the reservoir, always do a "root drip test" by lifting and tilting the tray slightly. You should see water droplets coming off the roots. If not, add more water until contact is consistent across the entire tray.
How much water do you put in the Kratky reservoir?
For a 10x20 setup using a 2-inch deep no-hole tray as the reservoir, we use about 14 cups of nutrient solution. This fills the reservoir while leaving roughly 1 to 2 inches of empty space from the top of the tray, which gives the roots breathing room (air gap). The air gap is important because the upper roots need access to oxygen, not just water.
Can you reuse the Kratky water for the next grow?
We don't recommend reusing Kratky water for a fresh grow. By the time you harvest, the nutrient balance has shifted significantly and there may be root debris or microbial buildup that could affect a new crop. Mix fresh nutrient solution for each new grow. The good news is your reusable silicone grow medium and trays are fully reusable, see our cleaning and sanitization guide for full maintenance protocols.
Is the Kratky method better than soil for growing microgreens?
It depends on your priorities. Soil is more forgiving for beginners and requires no nutrient mixing or pH balancing. The Kratky method is dramatically lower maintenance once set up (no daily watering), produces cleaner harvests with no soil cleanup, uses a reusable medium that saves money over time, and is great for hands-off growers. For dense seeding, see our case study comparing coco coir vs. reusable medium where the reusable medium outperformed coco coir by 35%.
Why don't Kratky microgreens get root rot?
Root rot is a real risk with the Kratky method for mature plants like tomatoes or peppers because they grow for weeks or months in stagnant water. Microgreens only need 4 to 8 days in the Kratky reservoir after germination, which isn't long enough for harmful bacteria or fungi to establish in significant numbers. The short grow cycle of microgreens is what makes the Kratky method so effective and low-risk for this specific use case.
Conclusion
The Kratky method offers an excellent solution for those looking for an easy-care gardening method while also cutting down the expenses associated with automated systems. It serves as a fantastic entry point into more sustainable growing practices, particularly through its efficient water use and the incorporation of our reusable silicone grow medium. However, other mediums can be used in its place.
We hope that this blog gave you enough guidance to start growing microgreens using the Kratky method so that you can step out for a weekend getaway or overnight trip while returning to abundant trays.
Happy growing! 🌱
-CJ & Mandi
Related Blogs You Might Enjoy
- How to Start Growing Microgreens: A Beginner's Guide
- How to Grow Broccoli Microgreens
- How to Grow Pea Microgreens (Pea Shoots): A Complete Guide
- Meet Our Reusable Silicone Grow Medium
- Which Microgreen Seeds Work on Reusable Grow Mediums?
- Case Study: Coco Coir vs. Reusable Grow Medium
- How to Build a DIY Mini DWC System
- How to Build a DIY Aeroponic System
- Weight to Blackout Timing Guide
- Best Fertilizers and Nutrients for Microgreens
- Best Microgreen Growing Advice and Resources
- How to Build a DIY NFT Hydroponic System: Complete Build-to-Harvest Guide
Updated: May 23, 2026
All content is property of On The Grow®, LLC
I find all of the information put out by On The Grow to be soooo helpful! They have saved me as a beginer to growing microgreens. I love how they pack their orders. I will 100% be coming back
Oh nevermind! I just found the mini set up on your website and ordered it!
Hope I made you laugh!!!
This is GREAT! I have been using the Kratky Method in Minnesota for 9 years to grow lettuce, spinach for winter consumption. I grow for myself… I also grow microgreens and appreciate you sharing your knowledge with videos and pdfs. NOW, I would like to have a mini-version such as a 10×10 or 5×5 setup. Any reason for me to hope? Thank you.
Hey there! Want to thank you sooo much for this read, Oh Wow, very interesting and such great precise content. You guys are amazing, I am going now to your youtube channel to watch your recommendations so I can start my feed the family and friends home micro setup and see where this takes me! xoxo Wishing you guys always Great Success!!
Great article. It confirms that what I have been doing is correct and I am on the right track. Great explanation with clear step-by-step photos. I use the reusable grow medium with your trays and I always get excellent harvest 😊