Professional Microgreens Grow Rack Setup - Easy Step by Step Quick Build Guide
Want to set-up a Professional Grow Rack that can grow some epic Microgreens? In this guide, we will show you, step-by-step, how easy it is to build and use a long-lasting, MASSIVE microgreen producing rack. (You can also grow edible flowers, and many other crops with it!)
Below is our YouTube video guide that you can follow along with as well in case things get confusing!
If you want to be fully ready to start your Microgreens Business and/or start growing fresh Microgreens at home, be sure to also check out our other blogs (Click here) where we talk about How To Grow Microgreens, How To Sanitize & Clean Trays and What to do with your Grow Medium after Harvesting.
Supplies You Need For This EPIC Build:
Here is a list of items that you will need to get started with your professional Microgreen grow rack --> Click Items for a direct link to them:
- Steel wiring shelf (48 x 24 x 72) from Seville Classics
- 2 extra shelves (can be found on Seville.com)
- Our Brand 120 mm fans OR AC Infinity brand 120 mm fans
- Dual-sided timer
- Triple-sided socket extender
- Zip ties or Velcro straps
- Rubber mallet
- Pair of clippers
- Eighteen (2 boxes) 20 watt LED lights
- Extension Cord with USB outlets
- Shelf Liners (optional)
Setting up the rack:
Your first job will be to get the shelf legs assembled. Notice the hollow, threaded space in the body of your shelf legs? These holes are where you can screw in the wheels for your Microgreen grow rack. We love using the wheels because it makes it easier to move the rack around if we want to rearrange them or clean any debris under them.

Once you have attached wheels to the legs of your rack, you will need to use the black connector pieces to secure the shelf in place. Do this by making sure that the side that says "top" is pointing the correct way. Match the two pieces around the shelf leg at the height you want to start your shelf. You will hear a snapping sound which will tell you that the connector is snug in its place. Make sure that the height at which you add the connectors is the same for all the shelf legs. Lay down all your shelf legs to compare and make sure that every connector is in its correct and matching location.
Take a shelf leg and slide it through the shelf stopper until the shelf tray reaches the connector. Do this for all four of your shelf legs until the first shelf has been set in its place.

Next, take your rubber mallet and tap your shelf evenly to make sure that it has firmly been lodged into its place. Be careful not to put too much pressure to avoid disrupting the orientation of your shelf! Your bottom shelf should be ready now!
With your lowest shelf rack in place, you will have to repeat the process of adding the connectors and shelves onto the legs. To make sure you are putting the connecting pieces in the correct place, you can count the rings on the legs. This helps us to know that all the pieces are even, and the shelf will be balanced.

Once you get your first two or three shelves on, you will have to add the other half of the rack's legs.
To do this, use the top-end connectors that came with your shelf's legs and fasten them at the threaded insert. After that, you can screw on the other half of the legs.

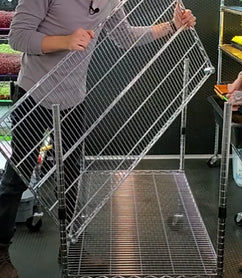
If you can, have another person to help you lift the next shelf and slide it onto the legs. The distance between the bottom shelf and the one above it should be approximately 9.5 - 12 inches. Make sure your connectors are all balanced and in place before sliding on the shelf.
We prefer to add two extra shelves to our racks, so that we get more grow space per sq. foot. To do this, we have to put our lights closer to our plants. This is why our shelves are around 9-10 inch spacing compared to the industry standard of 12 inches. By having narrower shelf heights, we are slightly limited to growing taller or more mature crops... Peas grow great in this spacing but can quickly touch the lights if left growing for too long.
You can choose a shelf height according to your preference or need. We've had setups where we had 3-shelves that had 10inch spacing and 2-shelves that had 14 inch spacing. You can also add the extra shelves at a later date if you want or need to expand!
Keep repeating the process of the shelves till you get to your desired number of growing spaces. Don’t forget to use your rubber mallet to tap your shelves to make sure that they have settled well in your Microgreen grow rack and always double check that your shelves spacing is even to avoid a lopsided shelf!
Installing the Fans
You want to add fans to your professional Microgreen grow rack to help prevent what's called "Micro-Climates" caused by the heat from the lights. This will also help you prevent issues with mold and overall, plants like good air circulation. Be sure to position the fans in the middle of your shelf on every shelf as this will help ventilate the air by creating a vortex.

**The fans we use in this video are NOT our brand that we sell on our website, however, they are similar. The fans on our website do not daisy chain together, however you can use a extension cord with USB ports to run multiple fans at the same time. If you need fans that daisy chain, here is the link to them - https://onthegrow.tv/ACInfinityFans
** These fans require you to remove the anti-vibration rubber knobs from all four top corners of the fan using a screwdriver. This way you can pass a zip-tie through the fan to secure it to the shelf.

To secure it we use a zip tie and slide it through the holes of the fan and loop it over the edge of the shelf. Repeat this for the top two holes of your fan to secure it firmly in its place. (remember we have a video if you need help!)

Loop around the wires of your fans such that the USB end faces towards your power source. Leave the fan intensity controller on the side where it is easily accessible. Tie your wire loops using a zip tie to keep cables from jumbling. Cable management is important y'all!

Connect all the fans from top to bottom using their USB connections so that it forms a series circuit. This is commonly referred to as "Daisy-Chaining". When you turn on the power source, all of the fans should work together. If a fan doesn’t operate correctly, check its power connection.
Tip- We like to keep our fans power on the "high" setting.

It is recommended that you use an extension with USB sockets so you can plug in your fan's while also making it look clean. Use your zip ties to hold and tie your extension cord to the top of your Microgreen grow rack build so that it is not vulnerable to water damage. Clip off the excess zip tie ends and always double check that your extension cord is long enough to reach the outlet that you plan on running it to.
Attaching The Lights:

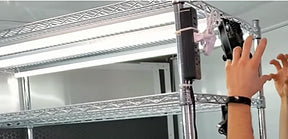
Using power cords with triangular connectors that come with the lights, plug in your 20-watt lights such that they are held firmly at the roof of each shelf without any zip ties. We do this by sliding the connectors through the triangular frame of the shelves. This way the lights will stand up by themselves... Do this for both ends of your light on either side of your shelf.

Next, you need to add another light near the middle of your shelf where you have your fans. Follow this with your final light which will be at the opposite end of your Microgreen grow rack such that all lights are parallel to each other and equally spaced.

For the third light, since it doesn't continue the daisy-chain, we just use a zip tie to fasten it to the shelf. You can use more lights if you want... in-fact, we had great results using 6 of these 20 watt LEDs in this video where it gave us some great growth!

Tip - We like to run our lights on a schedule of 17 hours ON and 7 hours OFF every day. The average cost to run three of these LED lights is around $0.12 per day...
Final Touches & Cable Management:

Use your two-sided timers and plug in your triple extender sockets. Doing this allows us to plug all the lights into the same single-timer. Plug the two-sided timer in at the bottom end of your main extension cord (the one that you have fixed at the top of your Microgreen grow rack).

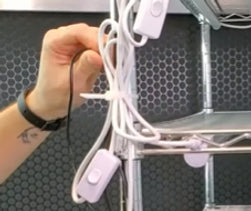
You can leave the chaotic mess of your wires as they are, or you can engage in some simple cable management to take your new Microgreens grow rack up a level. This is really easy and involves tying wires and cords together with zip ties so that your rack looks less sloppy. We do this on every single rack we build...

Wrap your wires together to form neat loops and tie them using zip ties. You can use the edges of your Microgreen grow rack for additional support. Make sure it looks professional and snug!
Add Shelf Liners

2nd to last step is to add shelf liners to protect the Microgreens below each wire shelf from falling plant debris. We really like these clear shelf liners AND these Matte Black ones (click here)
The final check
All you have left to do is plug your extension cord to your power source, make sure your lights are connected to the timer and that it's set correctly to 17 hours on & 7 hours off! Also, make sure your fan's are plugged directly into the extension cords USB slot so that they are spinning 24/7 on the "high" setting! If everything looks like it's working and set correctly, you should be good to start using your Microgreens Grow Rack! *Remember to use water with caution near your lights, cables, and fans!!*
How much money can you make from a single Microgreen grow rack?
This rack setup can hold Four 1020 BSF trays per shelf, with there being 6 shelves that means you can have 24 Trays of microgreens growing at the same time. When we were selling, we aimed to always get a minimum of $15-45 per tray for our Microgreens. That means you could make roughly $360 to $1,080 per Microgreen rack, every 24 tray rotation that you sell.... We grew high-quality product and people were happy to buy them! Now we primarily grow for ourselves and family, and having these racks allows us to grow amazing produce for cheap!! It costs around $3.00 on average for us to grow a pound of organic broccoli microgreens! To build this entire rack brand new, it costs around $530 not including trays, seeds & electricity. You can always check Craigslist or local stores for any NSF wire shelving!

Growing microgreens has changed our lives, and the lives of our community members for the better. From embracing a healthy diet plan to mentally relaxing themselves to connecting with nature and their families. You can use this grow rack to grow & nourish your Microgreens or any other plant of your liking; it's really easy to make it your own!
(This blog was written based off of our popular YouTube Video on "How To Build A Professional Microgreens Grow Rack)
------------------------
Curious about other Growing supplies we use?
Check out our Amazon Affiliate Store Front by clicking (here)
-------------------------
Written by: On The Grow®, LLC
Published: September 10, 2020
All content shown is Property of On The Grow®, LLC
